")
WordPress is used by over 40% of websites, making it one of the most popular platforms out there. Whether you’re running a personal blog, an online store, or a business site, understanding the different user roles in WordPress and knowing how to manage them is crucial for keeping things running smoothly and securely.
If you’re new to WordPress, this guide will walk you through the basics of user roles, explain what each role can do, and give you practical tips for managing them effectively.
What Are User Roles in WordPress?
WordPress user roles are like job titles for your website, each with its own set of permissions. They decide what someone can or can’t do on your site, whether it’s managing plugins, writing posts, or just editing their profile. Assigning the right roles helps keep things running smoothly by giving people access only to the features they need.
Let’s break down each default role, what they can do, and who they’re best for.
1. Subscriber
Access Level: Minimal
Subscribers have the simplest role in WordPress. They can log in, manage their profile, and access content meant for registered users, but that’s about it. This role is perfect for users who only need to interact with the site occasionally, like readers or members of a subscription-based site.
Capabilities:
- Update their own profile (e.g., username, email, or password).
- View restricted or subscription-based content, if enabled by the site.
Limitations:
- Cannot create, edit, or publish posts.
- No access to site settings or administrative features.
Best For: Subscribers are great for membership websites, blogs with restricted content, or online communities where users only need limited access.
2. Contributor
Access Level: Limited Content Creation
The Contributor role is a step up from Subscriber, designed for users who actively contribute to the site’s content but require oversight. Contributors can write and edit their own posts, but they cannot publish them directly. Instead, their posts must be submitted for review by an Editor or Administrator, ensuring that all content aligns with the site’s quality standards.
Capabilities:
- Create and edit their own posts.
- Submit posts for review by higher-level users.
Limitations:
- Cannot publish posts independently.
- Cannot upload media files such as images, videos, or documents.
- No access to site settings or other users’ content.
Best For: Contributors are ideal for guest writers, interns, or freelancers who create content under supervision. Their posts require approval before going live, which keeps your site’s quality and tone consistent.
3. Author
Access Level: Independent Content Creator
The Author role is tailored for users who frequently contribute content and are trusted to manage their own work without constant supervision. Authors can write, edit, and publish their own posts, giving them greater autonomy than Contributors. Additionally, they can upload media files, making it easier to create visually engaging content.
Capabilities:
- Write, edit, and publish their own posts without requiring approval.
- Upload media files directly to the WordPress media library.
- Edit or delete their published posts if necessary.
Limitations:
- Cannot edit or delete posts created by other users.
- Cannot modify site settings, themes, or plugins.
Best For: Authors are perfect for regular content creators like staff writers or bloggers who need autonomy but don’t require access to sensitive parts of the site.
4. Editor
Access Level: Content Manager
Editors are responsible for managing all the content on a WordPress site. They can edit, publish, and delete any post, regardless of who wrote it. They also manage categories, tags, and comments, making sure the site stays well-organized and professional. However, editors cannot access administrative settings like plugins or themes.
Capabilities:
- Edit, publish, and delete any post, including those created by other users.
- Manage site categories and tags for better content organization.
- Moderate comments to maintain a respectful and engaging community.
Limitations:
- Cannot make changes to site settings, plugins, or themes.
- No access to managing user roles or accounts.
Best For: Editors are best for content managers or team leaders who oversee the publishing process. They ensure the site’s content meets quality standards and stays aligned with its goals.
5. Administrator
Access Level: Full Site Control
The Administrator role is the highest level of access on a single WordPress site. Administrators can manage everything, from site settings to user accounts. This role is typically reserved for site owners or trusted team members.
Capabilities:
- Manage all content, including posts and pages.
- Add, edit, and delete user accounts, including other Administrators.
- Install, activate, and deactivate plugins and themes.
- Change site settings and configurations.
Limitations:
- Nothing! Administrators have full control over their WordPress site.
Best For: Administrators are ideal for site owners, developers, or highly trusted team members responsible for maintaining the site’s functionality and security. Be cautious with this role—only a few people should have this level of access.
6. Super Administrator
Access Level: Network-Wide Control
Super Administrators are unique to WordPress Multisite setups, where multiple websites are managed under one network. They have full control across all sites, from adding new sites to managing plugins and themes for the entire network.
Capabilities:
- Manage the entire network of sites, including creating or deleting sites.
- Control network-wide settings, themes, and plugins.
- Add or remove Administrators for individual sites within the network.
Limitations:
- Again, nothing! Super Administrators have the highest level of access within a WordPress
Best For: This role is best for IT professionals or administrators overseeing large networks, like those used by universities, corporations, or large organizations.
Understanding these roles makes managing a WordPress site much easier. By assigning the right role to each user, you can delegate tasks, keep your site secure, and maintain a smooth workflow. Whether it’s a simple blog or a complex network, these roles help keep everything under control.
Customizing User Roles
WordPress comes with default user roles, but sometimes these roles don’t fit the exact needs of your site. You may want to adjust the capabilities of a role or create entirely new ones to match the unique requirements of your team or audience. Customizing user roles can help you improve workflow, enhance security, and ensure each user has access to the right tools.
For instance, you might want to allow Contributors to upload images or limit an Editor’s ability to delete content. By tailoring roles, you can create a more efficient and secure environment for your website’s users.
So, how do you assign roles to new users or modify them for existing ones? Let’s explore the process of assigning and changing user roles.
How to Modify an Existing User Role in WordPress
If you want to adjust what users can or can’t do on your WordPress site, modifying an existing user role is the way to go. Whether you need to give someone more permissions or take away access to certain features, it’s a great way to keep your site secure and organized. The good news is, you don’t need any coding skills to do this—WordPress makes it simple.
Here’s how you can modify an existing user role:
Step 1: Install a Role Management Plugin (if needed)
By default, WordPress doesn’t offer a built-in way to modify user roles beyond what’s already set. To unlock advanced role customization, you can install a plugin like User Role Editor or Members. These plugins allow you to modify existing roles and create new ones easily.
- Go to your WordPress dashboard.
- Navigate to Plugins > Add New.
- Search for User Role Editor or Members (or another role management plugin of your choice).
- Click Install Now, then activate the plugin.
Step 2: Access the Role Management Plugin
After installing and activating the plugin, you’ll see a new menu item in your dashboard for role management. This may appear as Users > User Role Editor or a similar option, depending on the plugin you installed.
Step 3: Select the Role to Modify
- In the plugin’s interface, you’ll see a list of existing user roles, such as Subscriber, Contributor, Author, Editor, and Administrator.
- Select the role you want to modify. This will display a list of the capabilities associated with that role.
Step 4: Modify Capabilities
- You’ll see checkboxes next to various capabilities (such as creating posts, editing posts, managing settings, etc.).
- To add a capability, simply check the box next to the permission you want to grant.
- To remove a capability, uncheck the box next to the permission you want to revoke.
Step 5: Save Changes
After making the desired changes, be sure to click the Update or Save Changes button to apply your modifications.
Step 6: Test the New Role Permissions
Once you’ve modified the role, it’s always a good idea to test the new permissions. You can do this by creating a test user with the modified role or assigning the role to an existing user to make sure everything works as expected.
How to Create a Custom User Role in WordPress
Creating a custom user role in WordPress allows you to tailor the permissions and capabilities to suit specific needs for your site. This is especially useful when you want a role that’s different from the default ones, such as a role for a specific team member or a particular type of content creator. By customizing user roles, you can streamline your workflow, improve security, and ensure that users only have access to the features they need.
Here’s how you can create a custom user role in WordPress:
Step 1: Install a Role Management Plugin (if needed)
WordPress doesn’t offer built-in functionality to create completely custom roles from scratch. However, you can use a plugin to easily manage user roles. Popular plugins like User Role Editor or Members let you create custom roles with the exact permissions you need.
To install a plugin:
- Go to your WordPress dashboard.
- Navigate to Plugins > Add New.
- Search for a plugin like User Role Editor or Members.
- Click Install Now, then activate the plugin.
Step 2: Access the Role Management Plugin
Once the plugin is activated, you’ll find a new option in your dashboard to manage user roles. For example, if you’ve installed User Role Editor, you’ll see a new menu item under Users > User Role Editor.
Step 3: Create a New Role
In the plugin’s interface, you’ll see an option to add a new user role. Click on Add New Role to begin creating a custom role.
- Role name: Give your role a clear and descriptive name, like “Content Editor” or “Support Staff.”
- Role type: You’ll also need to decide if this custom role will be based on an existing role or if it should start from scratch. You can choose to base it on a predefined role like Editor or Author, which automatically adds basic capabilities.
Step 4: Customize the Permissions
Once the new role is created, you’ll be able to customize its capabilities. The plugin will display a list of available actions, such as:
- Creating posts
- Editing posts
- Managing plugins
- Modifying site settings
For each capability, you can either check or uncheck the box to grant or remove permissions. Be careful to only grant the necessary permissions based on the role’s purpose.
Step 5: Save the New Role
After you’ve configured the new custom role, don’t forget to click Save Changes or Update to apply your new settings.
Step 6: Assign the Custom Role to Users
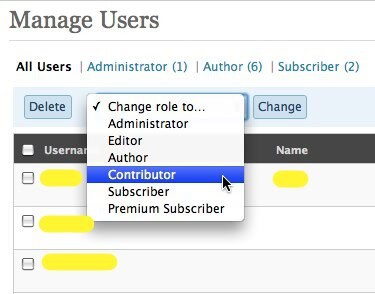
With the custom role created, you can now assign it to specific users. Simply go to Users > All Users, select a user, and change their role to your newly created custom role.
Step 7: Test the New Role
To ensure everything is set up correctly, test the new custom role by logging in as a user with that role. Check that the permissions you granted are working as expected and that users can only access the areas of the site you want them to.
And that’s it! By following these steps, you can easily modify user roles in WordPress to meet your site’s needs. Whether you want to give more permissions to trusted users or limit access to certain parts of your site, customizing roles ensures everything runs smoothly and securely.
Common Mistakes When Managing User Roles
Managing user roles in WordPress is essential for keeping your website secure and organized. But there are a few common mistakes that can create security risks or mess with your workflow.
Here are some of the most common pitfalls to watch out for:
1. Giving Users Too Many Permissions
One of the biggest mistakes is giving users more permissions than they need. For example, if you give a Contributor or Author access to important settings, they could accidentally make changes or even cause security problems. Always check that users only have access to what they need to do their job.
2. Not Reviewing User Roles Regularly
As your website grows, user roles can need to be updated. It’s important to check user roles and permissions from time to time, especially if there have been any changes to your team. If old users still have access to areas they don’t need, it could pose a security risk.
3. Assigning Multiple Roles to One User
WordPress allows you to assign more than one role to a user, but this can get confusing. For example, if you assign both the Editor and Administrator roles to a user, they might have conflicting permissions. It’s best to keep things simple and avoid overlapping roles.
4. Not Using Role Management Plugins
WordPress doesn’t offer a built-in way to fully customize user roles, so you might feel limited in managing permissions. If you’re not using a role management plugin, you may find yourself stuck with rigid roles that don’t fit your site’s needs. Plugins like User Role Editor or Members make it much easier to manage roles and permissions.
5. Allowing Too Many Admin Users
Giving too many people Admin access is risky, especially if they don’t need full control over your site. Admins can change settings, install plugins, and delete content, so it’s important to limit this role. Only assign Admin access to users who really need it.
6. Not Setting Role-Based Restrictions
Many WordPress sites forget to set proper restrictions for different roles. For example, a Subscriber might have access to areas they shouldn’t. Make sure each role has the right restrictions, so users can only see or do what they’re supposed to, keeping your site secure.
7. Not Testing Changes
After making changes to user roles, always test them. Create a test user with the modified role and check if everything is working as expected. It’s easy to miss a small detail, and testing helps you catch any issues before they affect your real users.
Final thoughts
Understanding and managing user roles in WordPress is essential for maintaining an organized, secure, and efficient site. From the powerful Administrator role to the limited Subscriber role, each user has specific permissions that can be tailored to fit your site’s needs.
By following best practices, avoiding common mistakes, and leveraging customization options, you can create a workflow that balances flexibility with security. Take the time to review your user management strategy and ensure that every role serves its purpose effectively.
Start exploring user roles today and take your WordPress site management to the next level! If you’re looking for expert assistance in managing and optimizing user roles for your WordPress site, we can help. Our team of professionals will ensure that your site remains secure, organized, and running smoothly. Reach out to SetmySite today to simplify your WordPress user management!